I have come across multiple pins about covering things in twine. I decided to do some wine bottles that have been sitting in my garage for a while. I sprayed the bottles with spray adhesive and then starting wrapping them up. I made 2 burlap rosettes and a maroon t-shirt rosette. I added some buttons to the center and then hot glued the rosettes to the bottles. Very simple and I am very happy with the way they came out!
Monday, December 17, 2012
Maroon Chevron Bulletin Board
I got the idea to do this from pinterest (of course!) for my office. I need a bulletin board but I needed to add a little bit of "Nadia" to it. Here is the pin I got my idea from. I found maroon and white chevron fabric that was over priced because the custom made it...but I had to have it! I cut the fabric to the board with a 1" extra to each side. I ironed to get out the creases.
I sprayed the board with spray adhesive and then put down the fabric.
Instead of buying upholstery tacks I bought a pack of 300 thumb tacks from Wal-Mart and spray painted them a bronze color.
Once you have your fabric put down you can start pushing down the thumb tacks. I did this over a few overs because your thumb begins to hurt, haha.
Between pushing in the tacks I created some fabric rosettes for the corner. I made three different sizes.
I added some buttons to my rosettes for an embellishment and then hot glued them on to the board!
Here is the final product!
Now I just need to find a spot for it in my office! :)
Wednesday, December 12, 2012
Gig'em Blocks
I came across a pin and loved the idea of spelling out gig'em on wooden blocks. Here is the original pin. I had some left over 2x4's from a previous project. I used three different sizes of blocks.
I then painted the blocks white and then found a font that I thought looked best for this. I printed the letters out and then placed them on their specific blocks. I used a ball point pen to trace the letters out and i pressed down pretty hard. I wanted to leave an indent in the wood as I traced the letters.
After tracing the letters out I went over the outline with a pencil so I would have a guide to go by when I painted on the maroon.
This was after a couple of coats of maroon. The paint I used was not very thick so I had to paint on multiple coats.
Next, I distressed the blocks all over the edges. I like love distressing. After distressing I sealed the blocks.
Here is the final product!
Friday, November 16, 2012
Wine bottle light!
I came across a pin a few days ago that was a wine bottle turned to a night light. Now that I know how to drill a hole in the wine bottle for the lights, I decided to give this a shot! Here is the pin I came across.
I decorated mine with these gems from Michael's. I stuck them on there with E600 super because I did not have my hot glue gun with me. I recommend using hot glue and start placing the gems at the bottom and work your way around and up. I went down with individual rows and it got hard because of the spacing.
Eventually when you have finally finished covering the whole bottle with them you get this awesome piece of art! I am thinking I might put this in my new office :)
Tuesday, November 13, 2012
Upcycled Wine Bottle
I have been keeping wine bottles in my garage for a little while now. I have been telling myself that I was going to do something with them. When I finally came across a pin, on how to drill a hole in glass, I got super excited!! I went to Home Depot and bought the glass and ceramic bits for about $10 for 4 different sizes.
I started with the second to smallest bit and started to dill away. You have to go pretty slow so you do not shatter the bottle. Once I got a good dent in it I switched over to the largest bit. This process took about 20-30 mins. I wore a padded glove and put the bottle in a pan to catch the sand from drilling.
Once the paint dried I inserted the lights in. I found these lights at Hobby Lobby and then use your 40% coupon. Yay for coupons!!
Take any wine bottle and convert it to this!
Wednesday, November 7, 2012
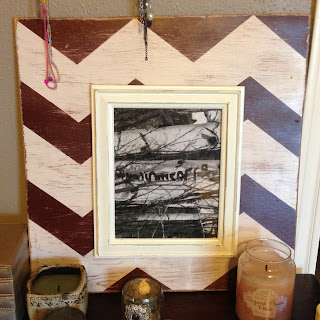
Chevron Frame
I had some left over boards in my garage and decided to make it into a frame. I wanted to do a maroon chevron design....Aggie Spirit! This could possibly one day go in my office. I really just wanted to give this a try and play with my saw! I plan to make more of these, in a smaller size, for my family wall.
I trimmed the board to 20x20 and mixed a little bit of white and brown together to get a cream color. I painted the whole board with it.
When the paint finally dried, I used 60 grit sand paper to do some distressing....I LOVE distressing!!
I had a 8x10 black frame laying around and decided to use that but paint it a cream color. I was hoping they cream in the chevron would match the cream of the frame...I was way off. I measured to find a center spot where the sides were equal and used a small nail to hang the frame. I am still looking for a picture to put in it and a home for it. For right now it is sitting on my dresser :)
Thursday, November 1, 2012
Thursday, October 18, 2012
Graduation Card Keepsake
I came across this idea for my graduation cards on Pinterest....of course! :) Here is the pin I came across. Then, there is th original pin. I combined these two wonderful ideas together and came up with this! I recently invested in a jigsaw and a circular saw. I bought some plywood...around the same thickness that you would get at Michael's for a 10" x 10" craft wood piece and for the same price. I measured the longest length and width of the cards and then added an extra 1" to that.
I drew out my pieces and went at it with my jigsaw! I drilled a hole through both pieces and made sure that none of the cards would be sticking out when the book was closed. I painted a maroon and white chevron design and distressed the edges. I added my name to the front with wooden letters that I already had. I wanted to put silver glitter but I did not have any :( I will go back and fix it so my name will sparkle!
I hole punched all my cards and got as close to the edge as I could.
Now, I have a lovely way to display all the wonderful graduation cards I received on my very special day! :)
Monday, September 10, 2012
First Game of The Season
I had to take a phone pic of the student section at our first home game of the season and in the SEC against the Florida Gators! It was packed!! I really should have taken my DSLR...next game I will!
Wednesday, August 29, 2012
Autumn
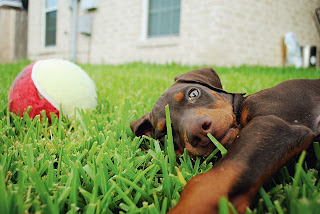
Meet Autumn! The newest family member to my sister and brother-in-laws family. She is around 3 months old and is a red doberman.
Subscribe to:
Comments (Atom)


.JPG)


